Wednesday 27 January 2010

Cabbage Fry with Roast Peanut

We bought a lot of cabbage last week, and just the two of us - I was making different things with small portions. And I dont like the taste of cooked cabbage, I dont mind it in the salad but cooked version doesn't impress me much, but to be polite I eat it. There was this last portion and I was wondering what can I make of it. Just then I called my mom and she suggested this recipe and it goes well with Roti. I was taken aback by the fact that goes well with Roti. So I decided to give it try.


So here is the recipe.........


Ingredients:

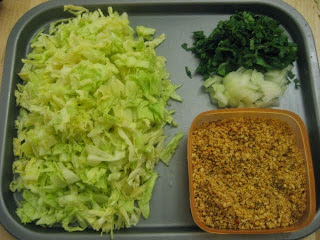
  • Chopped Cabbage - Half portion of a medium sized
  • Chopped Onions - 1 Medium Sized
  • Peanut - one handful
  • Dry Red Chillies - 4 Nos
  • Jeera (Cumin) - 1 Tsp
  • Chopped Coriander - 2 Tsp
  • Chopped Mint Leaves - 1 Tsp (Dont add more, for this will over power the dish)
  • Curry Leaves for garnish
  • Oil - 2 Tsp
  • Salt to Taste.

Method:

Dry roast the Jeera, Chillies and Peanuts (all seperately). After roasting the Peanuts ensure to cool and remove the thin pink skin, and grind all the three together in a coarse powder. Now heat the oil in a kadai and saute the Onions till they turn pink. Add the chopped cabbage saute for 5 minutes, add salt, water and cover cook it. After the cabbage is cooked add the coriander and mint and saute till the water dries up. Now add the coarse powder and mix thoroughly, the powder may look a little more but more the taste peanut better will the output. Now garnish with curry leaves and we are done. Enjoy with Roti or Rice.

You can replace the vegetable with Ridged/Bottle/Ash Gourd or French beans or white Pumpkin, just be creative dont be scared its gonna taste good.

Saturday 16 January 2010

Mor Kuzhambu

Now that I mentioned about Mor Kuzhambu in my last post, I thought I should post the recipe of this simple, yet tasty sauce using Yoghurt (curd). Another comfort food from the kitchens of south India. Its like the punjabi/Gujrati kaddi.


Ingredients:
  • Yoghart (Curd) - 1 Cup
  • Green Chillies - 4 nos
  • Popped dhal - 2 Tsp
  • Grated/Chopped Cocunut - 1 1/2 Tsp
  • Jeera Powder - 1 Tsp
  • Tumeric Powder - 1/4 Tsp
  • Ginger paste - 1 Tsp
  • Mustard Seeds - 1/2 Tsp
  • Fenugreek Seeds - 1/2 Tsp
  • Curry Leaves - 1 Sprig
  • Red Chilli - 1 nos
  • Asafoetida powder - 1 Pinch
  • Salt to taste
  • Oil - 1 1/2 Tsp


Method:

Grind Coconut, Chillies, Ginger Paste, Jeera Powder, Tumeric Powder and Popped Dhal into a smooth paste with some water. Now pour in the Yoghurt and whisk it into the mixture.
Heat oil in a sauce pan add the Mustard Seeds, Fenugreek seeds, curry leaves, Red Chilli and Asafoetida, now add the ground mixture, salt and let it boil. And thats about, its ready.


Let the sauce cool and enjoy with Rice. I personally dont like it too hot.

Seppankizhangu Fry

This is a Root variety, called sappankizhangu in Tamil, Arby in Hindi and may be Taro Root in English. But when I checked in the local markets here, it was called "Edhoe". It Looks big like a Hybrid version. In a vegetarian Kitchen, this root is a substitute for potato. And believe me a very tasty sides with Sambar and Rice or good with Mor Kuzhambu.


Ingredients:
  • Seppankizhangu - 300 Gms
  • Chilli Powder - 1 1/2 Tsp
  • Coriander Powder - 1 Tsp
  • Tumeric Powder - 1/4 Tsp
  • Salt to taste
  • Oil for Shallow frying
Method:

Wash the root with some water, you can use pressure cooker, its cooks very soon, so one whistle should do. I had a little reservation to use the pressure cooker here for the size of the root was so big, so unsure on how long it will take. So I cooked it in a sauce pan, checking in between by pricking with a knife. Once done and cool, peel and cut into thin slices, you can be as creative as possible, but I prefer slicing it.

In another bowl mix all the other spices and salt with a little water into a paste. Now add the sliced roots and mix into the paste ensuring to coat every slice.


Heat a little oil, just a thin coat in a frying Pan. Though I mentioned shallow fry earlier, use teh least oil. Now drop the seppankizhangu in the pan over medium heat and fry, dont crowd the pan, just lay one layer a time and fry both sides till crisp and brown.


Patience is required while frying in small batches and waiting to turn sides.

Now enjoy with Sambar and Rice or I can just eat up just like that. Its difficult to resist.

Friday 15 January 2010

Pongalo....O..Pongal

Its Pongal, and I was absolutely not interested, rather I was too depressed for I was away from India and most important away from Family. And back Home people adore the Sweet Pongal that I make, and guess what the Pongal that I made this time was a disaster. See the way you feel, your emotions get transferred to what you are cooking. However the "Masala Vada" which my signature snack was very good. I menu was very standard and simple. I made "Sakkarai Pongal" (the recipe of which I will post the next time that I make it), "Venn Pongal" and "Masala Vada".

Coming to the Festival it is celebrated on 14 or 15 Jan and in the Tamil Calender it is the 1st day of the Thai Masam. This is Harvest Festival, and believed be the Tamil New Year may be because the Festival ends the month of Marghazhi where its inauspicious to conduct weddings, so thats why the saying goes to say "Thai pirandha Vazhi pirrakkum" meaning the birth of the month Thai will pave for new opportunities. Like I mentioned that it is a Harvest Festival, so celebrated in a big way in the Villages, thanking the Nature Gods such as Sun, Rain, land and the animals that have helped in the Farming. The Festival is celebrated over 5 days in Tamil Nadu. What a vacation, well I am used styaing in Bangalore all my Life so never got to see the real Pongal.

The word Pongal means "Boiling over or rather spilling over" and this symbolises the prosperity and the Future well being of the Family. And the ingredients that are used in this are the newly Harvested Rice, Lentils, Jaggery, and Milk. Its also like offering to God the first share of the Produce.
The Masala vada came out very well, Crispy and perfectly spiced.


Ingredients:
  • Channa Dhal - 1 Cup
  • Green Chillies - 6 nos
  • Ginger - 1 Inch (grated)
  • Freshly Ground Spice - A Small piece Cinnamon, 2 Cloves, 1/2 tsp Fennel.
  • Finely Chopped Onion - 2/3 cup
  • Chopped Fresh Coriander - 2 Tsp
  • Salt to Taste
  • Oil for Deep Frying
Method:

Soak the Channa Dhal for an Hour. Drain the water completely, this is very important else the mix will become soggy and the vada will not be crispy. Put in a small blender jar, add the chillies, ginger, spices and salt. And grind into a coarse mixture, this will look a little dry, but thats the way it should be. Transfer the mixture into a wide bowl, now add the chopped Onions and Fresh Coriander.
Heat oil for deep frying in Kadai on medium heat. Make small dumplings such that its slightly thicker in the center and gradually descends and slip it in the hot oil and fry on both the sides till brown.


Hot Vadas are ready, serve with chutney or chilli sweet sauce.

Wednesday 13 January 2010

Vatha Kuzhambhu

Vatha Kuzhambhu is such a comfort food and a must do atleast once a month in every household in South India. Its a combination of spice, sweet and sour. Very Simple to make and tastes awesome.

Ingredients:
  • Tamarind Extract - 1 Cup
  • Sambar Powder - 2 tsp
  • Mustard Seeds - 1/2 tsp
  • Fenugreek Seeds - 1/2 tsp
  • Asafoetida Powder - 1 Pinch
  • Curry leaves - 1 Sprig
  • Oil - 2 tsp
  • Salt to taste
Method:

Heat oil in a kadai, now add the mustard seeds. Once the mustard seeds splutters add the curry leaves and Fenugreek seeds. Now pour the Tamarind extract and some water. Add the Sambar Powder, Salt and Asafoetida mix well and let it simmer for quite some time or until the liquid reduces to half the quantity. And thats it, we are ready to taste it. The trick is to let the liquid simmer, thats where the tastes get blended and ofcourse the Sambar Powder is the real trick. I will post the recipe for Sambar Powder shortly or you can use any of the Sambar Powder that you get in Indian Stores like Aachi, Shakti etc.


Now this is a little spicy curry, so serve it with Ghee and the side vegetable a little sweet one like Cabbage or Beans Poriyal. And goes without saying it tastes best with Hot Steamed Rice.


Enjoy!!!!!

Sunday 10 January 2010

Kerala Parota

Yeah...Parota..Yes it is spelt that way. This kind of Bread is very famous in South India and Sri Lanka. Its a Kinda Lachcha (hope Spelt this right) Paratha.
First of all, if you are Calorie conscious, Healthy eating, etc., then please be away from it, for it is made with loads of oil and Maida......Hmmmmm....see I said it is not healthy at all. But Many people (that includes my Husband) like it very much. Especially people from Kerala, see thats where the name comes from.


Its tastes best with any Spicy Curries (veg or non veg) and Onion Raitha.

Right now I am just gonna share the art of making the Parota only. Its a very skillful thing to do. You can get Frozen stuff at all the Indian Stores, but I dont prefer any Frozen Ready to eat stuff, not sure why, but I dont like them.

OK, the Recipe.

Ingredients:
  • Maida - 3 Cups
  • Water - per Requirement (I have never Measured)
  • Oil - Loads of it (Just Forget the Fat)
  • Salt - 1 Tsp
Method:

Make a soft Dough with Maida and water, very soft and watery consistency. Then Pour in a handful Oil and let the Dough sit for 30 mins. The Picture below shows the consistency of the Dough.


After 30 mins (atleast), the dough is ready. Take a handful, quite a bigger portion of the dough and Flatten it with a Rolling Pin using some oil to avoid sticking. Dont worry about the Shape, for this is just the first step, theres still more to come.


Spread it as thin as possible, again dont worry about the shape, and use oil if necessary, I used loads of it. Now Start folding like a Japanese Fan, Like we used to do as kids with paper.


Once you complete this step, the Dough portion will look like a strip, when you turn it on the other (not the opposite side, but just one turn) side, you see the layers, Now swirl into a circular shape, like shown below. Now this is very important else the output will not have the layers appropriately.


See the swirls are visible with some texture. Now Flatten this thing with a Rolling pin or just with your palm, for it does not need to be too thing. It should be 0.5 cm -1 cm thick. When your flattening it, you will notice the Swirls getting bigger.


Heat a Pan/Tava on medium, Lift this piece of art carefully for the dough is soft and fry in the Tava on both sided.


After turning the first time, start pressing rigorously with a Wooden Spatula everywhere, else the Dough will not get cooked properly. There is no need to add oil, for its already loaded.


See you still see the layers, once you take off the pan, put it on a chopping board or on a clean kitchen Counter, and start beaten between your palms (like clapping) from all directions, then the layers will flake out, making it look fluffy.


If you have visited Kerala or Tamil Nadu, you would have seen people do this outside small Hotels very Skillfully.
Caution the Parota will be really hot, you wear a Cooking Mitten and do this. I am used to doing this with bear hands.

It will taste very good with Vegetable Korma, Chicken Curry, Mutton Stew or any curry with the "Coconut". You see the Parota is from Kerala.
Another word of Caution, eat it hot else it will get Rubbery and Chewy.


Bisibelebath

Another famous dish from Bangalore....Oh I love this and Bangalore. Actually I love Bangalore more...the things associated with it comes later. I like my old Bangalore and all the Beautiful things...Namma Bengaluru....I actually I dont like the new name...Ok..Ok...let me stop the bragging and get to the dish. This dish is a meal in a dish. It has the lentils, Rice, vegetables etc...See I told you all the good things packed in one bowl.


Ingredients:
  • Cooked Toor Dhal(Lentils) - 1 Cup
  • Cooked Rice - 1 Cup
  • Boiled Peanuts - 1/2 cup
  • Onions - 1 Medium Sized (Sliced)
  • Carrot - 1 Diced
  • Beans - 6 Diced
  • Capsicum - 1 Diced (red, green or yellow)
  • Chopped Tomatoes in a Can - 3/4 cup
  • Canned Garden Peas - 1/2 Cup
  • Bisibele Bath Powder - 3 Heaped Spoons
  • Salt to Taste
  • Oil - 1/2 Cup

For Garnish:

Ghee (Clarified Butter), Curry Leaves and Cashewnuts.

Now, I use canned vegetables with a reason, in the winter especially, since I feel the tomatoes that we get in here during Winter is not organically grown. I mean I read it somewhere that it is almost impossible to grow vegetables or Fruits in the winter and how does the stores stock Tomatoes, oranges etc all round the year. So these vegetables in the Cans may be grown in the right season and canned for later use. I specifically choose the sun grown stuff.

Method:

There are different methods to make this, but guess this is the easiest way when you have all the stuff cooked and boiled. All that is pending is assembling them is this beautiful dish.
Heat the oil in a heavy bottomed pan or a sauce pan drop in the sliced onions and Saute till translucent, then drop in all the vegetables and tomates, Saute for 2-3 mins on medium heat. Then pour in some water and let the vegetables cook. Once they are almost cooked put in the salt and Bisibelebath powder (My mom makes this for me all the time, but I will post the recipe for this once I can get hold of a Coffee Grinder so that I can make it myself, but not sure if I can match my mom's standards). And let is blend in and cook for another 2-3 mins, now mix the Cooked dhal and rice. Add water to adjust the consistency, now heat Ghee a small Kadai and put in the curry leaves and cashewnut and Garnish over the Bisibelebath and mix it well so that the ghee is all over. Dont be stingy about the ghee for it adds to the taste of the dish.

I prefer chopping the vegetables to small bits since bigger sized ones calls for picking and not eating.

Dont worry about the calories and enjoy the dish with some Potato wafers(chips).


Friday 8 January 2010

Akki Roti

This is one of Bangalore's very famous snacks and my favourite too. It can be eaten for Breakfast or for an evening Snack or Dinner. I remember those days when mom used to make it hot...hot..and I used to enjoy it happily with no worries. Hmmmmmm....I miss it all. Now I am the one making them so actually cannot enjoy it much.


Ok here goes the recipe.....

Ingredients:
  • Rice Flour - 1 Cup
  • Water - 1 1/2 Cup
  • Onions - 3/4 Cup Finely Chopped
  • Green Chillies - 3 Finely Chopped
  • Salt to taste
  • Oil for frying

You can actually add many things like jeera, sesame seeds, peas, methi etc..,

But this is the regular version prepared at home.

Method:

Boil the water in a medium sized sauce pa, once the water starts to boil, drop in the onions, chillies and slt. Place a woodenspatula in the pan, lower the flame and gradually add the flour. Just leave the floursettle do not mix right away. After a couple of minutes start mixing without any lumos into a smooth dough consistency.

Take a clean plastic sheet (a zip lock bag also will do). Take a small portion of the dough, just a handful and spread it on the plastic sheet into a thin sheet with wet hands and a few drops of oil like a chapathi.


In the meantime heat the tava and once it is hot enough put in the rice sheet. Pour in a spoon of oil around and over the roti. And ensure to keep the heat on medium and fry on both sides.
Caution - Don't try to turn the roti before its done, else it will break. The edges will start turning brown which is an indication that the side is done.


Now enjoy the Hot Akki Roti with Chutney and Pickles. Onion Chutney is the best combination with it.


Monday 4 January 2010

Peanut chutney

Yeah! its raining Chutney.....hahaaa. Definitely my husband is having fun and happy. Finally we got make chutney at home. I learnt this chutney from my mother in law and its my Husband's Favourite and how can I not learn it.


Ingredients:
  • Roasted Peanuts - 4 Tablespoon
  • Finely chopped Coconut - 2 Tablespoon
  • Red Chillies - 5
  • Tamarind - per taste
  • Salt to taste
For Garnish:
Oil, Mustard seeds, One red chilli and asafoetida


Place all the ingredients in a Blender and grind into a frim and a little coarse paste. This chutney has to be a little firm so ensure not to add too much water.
For Garnishing heat the oil in a small Kadai, add the Mustard seeds, chilli and asafoetida and pour over the chutney.
This is a peanut chutney, hence the flavour of peanut should be dominant. Ensure that the coconut quantity is lesser than the peanuts.
Enjoy this chutney with Dosa, idllis, or akki roti. But it tastes best with steaming hot idllis.

Friday 1 January 2010

Coriander Chutney

It is very strange to be posting a recipe of Coriander chutney in my Blog. Just imagine my first post and a coriander chutney. Actually this chutney is very precious and important for us, for we happened to eat a homemade chutney after three months, we were settling in London and had to do a lot of other important things rather than research for a Blender and buy one. So here was the holiday time and we had enough time to buy a Blender and we settled with a Breville 400 watt hand Blender. Its good so far, and I was more than excited to start off a full fledge cooking....oh my goodness...I am so happy :-)


Here is the recipe, very simple one that we all do at home.


Ingredients:

  • 4 Tsp - Grated Coconut
  • 2 Tsp - popped channa dhal
  • Coriander a Handfull
  • 4- Green Chillies
  • Tamarind as per taste
  • 3/4 tsp Ginger Paste
  • Salt to Taste

For Garnish:
Oil, Mustard Seeds, Urad Dhal, 1 Red Chilli broken into two and a pinch of asafoetida(Hing)


Place all the ingredients expect for the garnish in a blender and grind into a firm and smooth paste, adjust as per taste. Once done tranfer to a small serving bowl.
Now for the Garnish, place a small kadai on heat and pour in two tsp of oil, drop in the mustard seeds and allow to splutter, now add the urad dhal and the red chilli, when the dhal gets to light brown colour add the asafoetida and pour over the chutney.

Enjoy the Chutney with idly or Dosa :-)


The quantity and measurements mentioned will be sufficient for 2 people.